Wednesday, April 27, 2011

Aloo Paratha (Potato FlatBread)


April 27th 2011

Who does not like Parathas? Especially if you don't have to make them...now I am talking right :) This is an easy recipe for Aloo Parathas that adult and child alike will love. Just play with the spices some based on whom you are making it for. Pair it with some pickle and thick yogurt (curd) and you have a finger licking combination. Eat them hot off the tava with a bit of butter/ghee on top and you will have comfort food in each bite.  

Time: 30 min (Preparation), 10 -20 min (Making time – based on # of parathas)

Difficulty Level: Easy -Medium

Ingredients:
  •  4-5 potatoes cooked in the pressure cooker. Peeled and mashed.
  • 3 cups of chapati flour/wheat flour/atta
  • Water
  •  Salt
  •  A pinch of turmeric
  • 1/2 tbsp garam masala
  • 1/2 tbsp chilly powder
  • ½ tbsp dhaniya-jeera powder
  • Oil 

Method de Preparation:

1.       Pressure cook the potatoes (allow 3 whistles). It is ok if the potatoes break, you are going to peel and mash them anyway. After they cool, peel, mash and keep aside.
2.       While the potatoes are cooking, take 3 cups of atta and add water as required and salt and knead into a dough. Consistency should be quite thick like play dough or clay. [Sorry – effects of too much play time with a toddler :P] Cover and keep aside.
3.       Take oil in a pan, a little bit. Add the potatoes and the powders and then just mix everything together into one filling. This helps the raw smell disappear and for the potatoes to last a bit longer.
4.       To actually make the parathas, take a chapatti pan/maker and a rolling pin. You can alternatively use a clean surface and a rolling pin also. Take a bit of flour in a plate and keep on the side to use.
5.       Make a round ball, the size of a yellow lemon. Flatten it between the palms of your hand. Dip in the flour mixture both sides.  Place on the flat surface and start flattening it out with a rolling pin. Try to make into a circle. With practice you will gain perfection ;) Here is a video link. This is quite amateurish and not perfectly round but I like it because if you knew how to make it very well you would not need the video anyway J
6.       The trick here is don’t flatten it out too much. Just about a 3-4 inch diameter. Then place a ball of the filling inside. Point to note is that this filling ball should be of a smaller size than the outer chapatti ball.
7.       Then cover the ball with the chapatti dough. It is better to cover it fully so that it is easier to roll out. But it is fine if a bit sticks out.
8.       Now re-dip in the flour on the side and then spread some more into a bigger circle. About a 5-6 inch diameter. Don’t try to roll too thin because this is a paratha and not a chapati/roti.
9.       After you have made a few, place tava/pan on stove and turn on heat. Cook as you would a pancake by heating on one side and then flipping over to the other side. Add a few tsps of ghee/butter/oil on each side. Allow to brown slightly.
10.   Serve hot with a side of thick yogurt (greek yogurt would work) and pickle. You can add some sugar in the yogurt for those who like it like that. Slurp..it is food that is tasty and filling to the heart and the stomach.

Confessions:

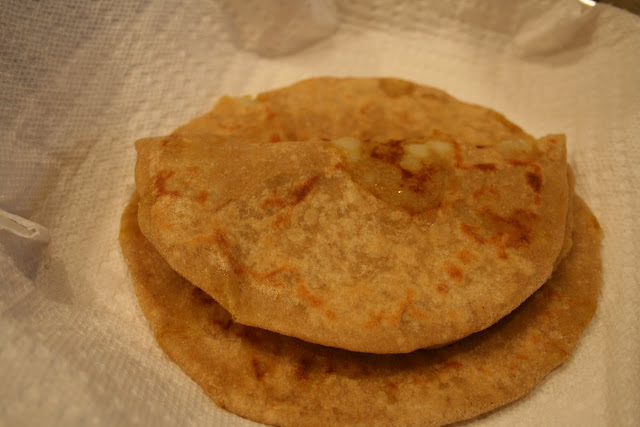
I know these are not the best looking parathas but I put them on the blog for a few reasons. (1) because even food that is not perfectly round, perfectly good looking can taste wonderful just like some of us humans :D (2) To also show that the filling can still come outside when you spread the parathas out and that is totally fine! (3) When one is making these for a toddler at 6:30 am..taste, speed and and only speed are the priority not size or shape :P


Saturday, April 16, 2011

Venthaya Kozhambu (Fenugreek Lentil Soup)

April 16th 2011

Now one recipe from my Amma's Kitchen.  This is a south Indian entrĂ©e that one mixes with rice. It is in the same family as the sambar but a simpler much easier to make lentil soup. When you are wanting something quick and easy and have no vegetables to use, this is an easy fix. Tastes best with fresh leaves but you can substitute with seeds in case of unavailability. The only time consuming aspect about the whole dish is getting the Venthaya or Fenugreek leaves ready.

Time: 20 min (Preparation), 10 min (actual making)

Difficulty Level: Easy

Ingredients:
  • 1 rice cup toor dal cooked in pressure cooker with 3 cups of water
  • little smaller than a lime size tamarind pulp and tamarind juice extracted from that or 1 tbsp tamarind concenterate
  • chilly powder - 1 tbsp
  • fenugreek leaves (a bunch) or just fenugreek seeds - 1 tbsp
  • mustard seeds - 2 tsps
  • red chilly - 3 to 4 nos
  • oil to temper
  • turmeric powder (a pinch)
  • salt to taste
  • curry leaves (2 to 3 nos)

Method de Preparation:
  1. Pressure cook toor dal in a cooker (allow 3 whistles or equivalent) and keep aside. 1 cup to 3 water ratio.
  2. If using fresh fenugreek leaves, seperate the leaves from the stalk, wash and keep aside.
  3. Take a vessel and add the extracted tamarind solution. Extract tamarind juice by soaking it in water, squeezing pulp, and repeat till water no longer turns brown in color. Easy way is to heat the tamarind in water for a  min in the microwave. This softens the pulp and allows you to extract the juice easily. Meaning extract about 1 to 1 1/2 cups tamarind water from the tamarind pulp or the tamarind concentrate in which case just mix it with the water.
  4. Take oil in a vessel.  Season with mustard and when it splutters add the red chillies. (If using fenugreek seeds, add it now before adding the tamarind solution.)
  5. If using fresh fenugreek leaves, at this point add the extracted tamarind solution and allow to boil adding a bit of turmeric. 
  6. When the tamarind extracted has boiled some and the raw smell goes away, add the fenugreek leaves and allow to boil for a couple of minutes. 
  7. Add salt and chilly powder and the cooked toor dal. Allow everything to boil together.
  8. Taste for salt and adjust spices accordingly. Add curry leaves (optional).
  9. Serve hot with rice and appalam.


Brussels Sprouts with Cranberry Pistachio Pesto

April 16th 2011

It would not be inaccurate to say that I must have made this almost a year ago. I think I was going through a phase where I was so driven to try out so many new recipes that on average I must have tried at least 2 new ones per weekend. Obviously work was less intense then I guess or I was younger :P

Anyway, when I saw this recipe, I knew I had to try it because more than anything I had never eaten Brussels sprouts and the sauce was too tempting to not try. I was enticed by how the flavors would blend together and taste.

Time: 20 min

Difficulty Level : Easy

Ingredients:

For the Brussels Sprouts
  • 1 1/2 pound brussels sprouts
  • 3 tbsp olive oil
  • 3/4 tsp kosher salt
  • 1/2 tsp freshly ground black pepper
  • 1/4 cup Cranberry Pistachio Pesto (see below)
For the Pesto
  • 1/2 cup toasted pistachios
  • 1/2 cup dried cranberries
  • 3 cloves roasted garlic
  • a bunch of parsley
  • 1/2 cup olive oil
  • salt and freshly ground black pepper to taste

Method of Preparation:
  1. Preheat oven to 400F degrees.
  2. Cut off ends of brussels sprouts, pull any loose outer leaves and cut them in half lengthwise, tossing with olive oil.
  3. On a baking sheet or tray, spread the sprouts evenly and roast for about 25 minutes, until you being to see a bit of browning. The interior should be tender when tested with a fork. [If you put any loose leaves they will brown earlier leading to a burnt smell, so be careful to keep checking.]
  4. Place ingredients for Pesto bar the olive oil in a blender and blend till ground semi-smooth. Drizzle in some olive oil in between to help grind and when done, stir in the remaining olive oil, seasoning with salt and black pepper to taste. The pesto will be slightly sweet and salty and more or less divine!
  5. Season the sprouts with salt and pepper and spoon the Cranberry Pistachio Pesto on top and dig right in.

Source: I came across this recipe originally at Steamy Kitchen here.

Confessions:
 OK, I'll go ahead and say it here because I know the Mr does not read this blog very much..I am not a big fan of brussels sprouts, at least the first time I tasted it. However I argue with him that one should eat everything and never say no and don't want to be caught not following my own rule :D. I truly truly loved the Cranberry Pistachio Pesto and it had a lovely sweet and salty flavor that would go well with any salad or even with an Alfredo or plain pasta. So there - few more ideas :)


Related Posts with Thumbnails