Monday, June 18, 2012

Spiderman Cake

When you love Spiderman as much as my son does, you don't have a choice but to make the hero the center of your world also because I love my son almost as much as he loves Spiderman, and that is saying a lot!

I made this cake a year ago for his 3rd birthday and looks like he will be just too happy if I repeat it because he loves Spidey all the more if that is even possible :) With the new movie that is going to be released in July, we have some more Spidey overdose to live with in the near future.

The cake might look very complicated but was actually not that hard to make. What made it hard was that instead of just choosing a simple cake - I made this also as a Strawberry Shortcake cake and that complicated things a bit. I used 1 and a half times the required ingredients for this size. I did cut this cake also into two and then stuffed the middle with the strawberry filling + icing, but for the top - I did not do that, I used the cream cheese  icing and then followed the instructions for decorations as is from the instruction sheet.  

Note 1 : I used cream cheese icing instead of the recommended butter cream icing as I had a lot of it and it worked just fine.

I got the Spiderman pan from Michaels and it is this one by Wilton. 

The instructions that come with the pan are very detailed and self explanatory and were all I used to make the decoration on the top.

Note 2: Make sure you coat the pan generously with the spray and also with flour. I did that and all the indentations came out perfectly on the cake without sticking to the bottom and make it so much easier to decorate.

And the amazement on your Spidey lover's face will be so worth it!


Saturday, June 16, 2012

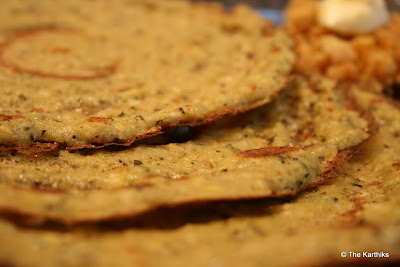
Adai (Lentil Crepe)


Adai is a kind of South Indian Dosa, a little bit thicker. It is made from a combination of lentils and rice. It goes with a side of Avial, Chutneys or like the Mr likes it - with jaggery and butter. Another good combo to go with this is just green chilies and salt ground and mixed with thick yogurt. So much for the sides, let's move on the main dish. This does not need any fermentation and only needs for the lentils to be soaked for some time, ground and the batter is ready to be made into mouth watering adais.

Difficulty level: Easy

Preparation Time: 3 hrs soaking time, 5 min grinding time, 2 mins per adai

Ingredients:

Soak for 3 hrs
  • 2 cups boiled or idly rice
  • 1 cup raw rice or long grain rice

Soak for 1/2 hr
  • 1 cup bengal gram
  • 1/2 cup toor dal
  • 1/2 cup black urad dal

To grind along with soaked lentils and rice
  • combination of green and red chilies (6-7 nos combined). You can use a combination of pepper and jeera (cumin) instead of the chilies when made for functions or just for a change also
  • 6-7 nos curry leaves
  • a bunch of cilantro (optional)
  • soak hing (solid) if available in water and add to this, else use powdered hing
  • Salt ( to taste)

Method de Preparation


  1. Soak the rice for longer (3 hrs) and the lentils (1/2 hr) separately, immersed in water.
  2. When done, grind together along with other ingredients in the list in a blender using not too much water. The consistency should be thicker than pancake batter, not runny. You can always add water later if needed.
  3. If you like the adai crisp, grind the rice first and add the lentils midway to get a coarse mix, not too soft.
  4. Once the batter is ready, heat the griddle and when hot, pour a spoonful of batter and spread out in a circle to make the adai. Add a bit of oil (1/2 tsp) on each side. Flip the Adai when done and add another 1/2 tsp of oil.
  5. The Adai is done and ready to be devoured.
  6. Goes with Avial on the side, or any chutney, or jaggery and butter or green chillies ground with yogurt. Whichever way you eat it you will love it!


Wednesday, June 6, 2012

Strawberry Shortcake cake


I can't believe it is already going to be a year since I made this cake :) I know that is how long it takes me sometimes to get to post some recipes, not good but at least I get to it at some point :P I came across this recipe as I was looking for a cake to make for my son's birthday. He loves strawberries and the Mr is not a big fan of chocolate and this looked different enough so I gave it a shot. 

I was very happy with the outcome. This is a great cake and very different from the usual cream filled birthday cakes. However I will not deny that it needed a good amount of work especially for the size I made it. So my only advise is to make this for a smaller size party or plan on spending some time if you want to make it for a bigger crowd. 

I used the larger of these rectangular pans  (resulted in a lot of cake enough for at least 20 people) and this link here for measurements. 

Time: Preparation Time (45 min), Cooking Time ( 60-70 min)

Difficulty Level: Medium

Ingredients:

I ended up using almost 3 times the required ingredients for the cake and the icing. However, I ended up with lots more icing than needed.   I suggest for the size of the pan I used, doubling the ingredients for the icing  is sufficient, but use triple times the ingredients for the cake. Below measurements work for a 8 or 9 inch round pan that is 2 inches deep at least.

Cake
  • 1 1/2 cups flour
  • 3 tbsps cornstarch
  • 1/2 tsp salt
  • 1 tsp baking soda
  • 9 tbsps unsalted butter, softened
  • 1 1/2 cup sugar
  • 3 whole large eggs
  • 1/2 cup sour cream, room temperature
  • 1 tsp vanilla
Icing
  • 1/2 pound cream cheese, room temperature
  • 2 sticks unsalted butter
  • 1 1/2 pound powdered sugar, sifted
  • 1 tsp vanilla
  • 1 pound strawberries

Method de Preparation:

Make the cake first, then work on the strawberry filling while the cake is in the oven baking and the icing when the strawberry filling is just sitting :)

  1. Sift together flour, salt, baking soda, and corn starch.
  2. Cream 9 tablespoons butter with the sugar until light and fluffy. Add eggs one at a time, mixing well each time. Add sour cream and vanilla and mix until combined. Add sifted dry ingredients and mix on low speed until just barely combined.
  3. Pour into greased and floured 8-inch or 9-inch cake pan. Bake at 350 degrees for 45 to 50 minutes, or until the cake is no longer jiggly when you shake the sides.  As soon as you can do remove from the cake pan after you pull it out of the oven, and place on a cooling rack and allow it to cool completely.
  4. Remove the leaves from the strawberries and slice them in half from bottom to top or from top to bottom, it really does not matter :) Place into a bowl and sprinkle with 3 tablespoons sugar. Stir together and let sit for 30 minutes. After 30 minutes, mash the strawberries in two batches. This gives your arms a great workout. Sprinkle each half with 1 tablespoons sugar and allow to sit for another 30 minutes.
  5. Make icing: combine cream cheese, 2 sticks butter, sifted powdered sugar, vanilla, and dash of salt in a mixing bowl. Mix until very light and fluffy.
  6. Slice cake in half through the middle.By now it should have cooled. Spread strawberries evenly over each half (cut side up), pouring on all the juices. Place cake halves into the freezer for five minutes, just to make icing easier.
  7. Remove from freezer. Use a little less than 1/3 of the icing to spread over the top of the strawberries on the bottom layer. Place the second layer on top. Add half of the remaining icing to the top spreading evenly, then spread the remaining 1/3 cup around the sides.
  8. Leave plain OR garnish with strawberry halves.
  9. The cake is best when served slightly cool. The butter content in the icing will cause it to soften at room temperature. For best results, don't leave out and store in the fridge. For that reason make sure you have place in your refrigerator for the size of cake you are making.
  10. Like I said I had a lot of icing, so I used some food coloring and piped the sides and top of the cake with some decorations.
Source: Ma lady Ree here.


Tuesday, June 5, 2012

Rajma sundal (Kidney Beans Sundal)


This is another sundal that I made during Navarathri last year. Easy to make and very healthy too. Sundal is just any bean/lentil tempered with oil and a few basic ingredients (mustard, black gram etc). It can be eaten on its own or as a side with other snacks.

Difficulty Level: Easy

Time: 8 hrs (prep time), 10 min (making time)

Ingredients:
  • Kidney beans - 1 cup ( you can use canned or fresh). If you are using fresh then they need to be soaked overnight
  • Water
  • 1 tbsp mustard seeds
  • 1 tbsp urad dal (black gram split)
  • few dry red chillies (2-3 nos) or a mix of green and red chillies
  • a couple of tbsps of grated coconut
  • few curry leaves
  • salt to taste
  • 1 tbsp oil


Method de Preparation:

  1. Soak the kidney beans covered in water overnight. Then cook them in the pressure cooker with the water drained, just enough to cover them for the equivalent of 3 whistles. If you cook them a lot they will become mushy which is still ok taste wise (like how mine turned out) but you may not see the individual beans. It is basically a taste preference. Any extra water can be drained and used for other cooking purposes.
  2. If you are using canned kidney beans just drain the beans and wash them. They can be used directly.
  3. Take oil in a pan, add the mustard. When it splutters, add the urad dal and the red chillies along with the curry leaves. When they are all done, add the rajma and then the coconut and salt to taste.
  4. Turn off heat and serve immediately or later :)

* This can be made almost instantly if you are using canned beans however the sodium levels will be much higher, so use fresh when you can.  Similarly you can use fresh or frozen coconut based on availability.


Tuesday, May 29, 2012

Tools of the Trade Tuesdays : Zoku Quick Pop Maker

If you have not heard of this before, fear not - neither had I. So I was so pleasantly surprised when I was gifted this by the Mr and the son last year. First that they knew about this and that they got it for me :) They both had sneaked out to purchase this and plopped it on the kitchen counter asking me to make what else some popsicles :)

Price : $50 (before any discounts)

Available at: Macys, Amazon, William Sonoma etc.

Images from: Google (various websites)

This link here covers pretty much everything you need to know about this Quick pop maker. For $50 you get the Quick pop maker, 6 popsicle holders with the drip holder and a tool for removing the pops out once they are done. Accessories and books are available for instructions on how to make some of the fancier looking popsicles. But trust me you won't be disappointed even with the most basic versions you make.


Pros:

  • If you have kids or live in a warm place, you will love having this. When you want a quick snack, just pour anything into this and voila it will be frozen into popsicles within 10 minutes. Your kids and their friends will love it!
  • The biggest advantage is that it makes popsicles almost instantly (~10 minutes for the first batch) and (~12 min for the second batch). I have very rarely made more than 6 at a time though it can make upto 9 popsicles before needing to be frozen again.
  • It is small enough to be stored in the freezer continuously, and my freezer is pretty packed  all the time (trust me).
  • It is a great way to sneak in healthy snacks - i often make mango lassi, kulfi, milkshakes and then serve it as popsicles - no complaints and often am asked for more :)

Cons:

  • Only the price because you get moulds for $10 or lesser on amazon but the pros outweigh the price in my opinion and the advantage of having ready made pops available for your child as against having to wait 48 hrs is worth it if you use it frequently enough.


Sunday, May 27, 2012

Vella Aval (Sweet Rice or Sweet Poha)

Aval or Flattened/Beaten rice is considered very auspicious and is used for many religious festivals as an offering to God. Vella Aval is specially made for Krishna Jayanthi. Extremely easy to make, it can be made even as a snack under very short notice. 

Difficulty Level: Easy

Time: 1 and 1/2 hrs (prep time), 10 min (making time)

Ingredients:
  • Aval - 1 cup
  • Water
  • Jaggery - 3/4 cup
  • 2 tbsp scraped coconut
  • a pinch of cardamom powder
  • 1 tbsp cashews
  • 1 tbsp ghee (clarified butter)

Method de Preparation:

  1. Soak Aval in water for an hour to an hour and a half and drain it, keep aside.
  2. Roast the cashews in ghee and keep aside.
  3. In the same vessel, take the jaggery on the stove top, add just a bit of water to immerse, and melt it.When it thickens starting to boil, add the coconut, cardamom powder and keep stirring.
  4. Add in the aval when the jaggery solution had reduced some in quantity and keep stirring, till it all comes together. Turn off heat at this point.

* The vella aval shown in the picture below has been cooked well but is not granular or separated by rice flakes. If you like it that way, soak the aval for lesser time and take care to condense the jaggery solution well before adding the aval.


Paal Payasam ( Milk Kheer or Rice Pudding)

When I think of Paal Payasam, the story that comes to my mind is that of the famous Tenali Raman. He is known for his great appetite along with his infamous wit. After a very sumptuous meal, he states he cannot even eat a morsel more. And proceeds to drink liters of this amazing dessert when it was served. The king asks him how he managed that when he said he was stuffed. To that the witty Tenali Raman responds "Your majesty, just like all the people in a crowded street clear the road when you arrive, all the food in my stomach clears way for the king of sweets - Paal payasam!"

Like any dish, making the paal payasam can be considered a trivial task where one can just mix milk, sugar and cooked rice and call it that :) However once you have tasted the dish as it should be made, you will know the difference trust me. I would like the recipe to speak for itself, but I urge you to go ahead and try this version and you will love it!

Difficultly level : Medium

Time : 30 min (prep time), 30 min (making time) -Pressure cooker method
          6 hrs (slow cooker method)

Ingredients:

  • Milk ( 1 litre or .25 gallons or 5 glasses)
  • 1/4 cup raw rice
  • 1 glass sugar (~ 200 to 250 gms)

Optional additions:
  • couple of strands of saffron
  • a tsp of ghee
  • a tbsp of cashews
  • a pinch of cardamom
* The glass I refer to here is a normal stainless steel one found in most Indian homes that holds about 200 ml of liquid.

Method de Preparation: ( Pressure cooker)

  1. In a vessel keep 3/4 the milk and the raw rice along with the strands of saffron (if adding) and allow to cook. Keep the heat at a medium to medium low and allow the mix to cook slowly (equivalent of 3-4 whistles).
  2. Once it is done and you can open the cooker, take the mixture out. The rice should have cooked well and the payasam will have a lovely pinkish/reddish tinge to it. 
  3. Transfer to a vessel on the stovetop, add the sugar and the remainder of the milk. Keep stirring without allowing it to stick to the bottom.  The mixture will first turn watery as the sugar melts some and then will begin to condense. When it does, you can turn off the gas. Approximately the payasam in the end will he half the original quantity you would have started off with.
  4. At this point, my mom is done. She keeps is plain, simple yet extremely tasty. If you like you can add a pinch of cardamom powder and also roast the cashews in ghee and add to this.


Method de Preparation: ( Slow Cooker)

  1. Add the rice,saffron and entire milk to the slow cooker and keep on lowest setting for the first 4 hours. You can mix a couple of times in between.
  2. Add the sugar and turn to medium setting and allow to cook for another 2 hrs.
  3. You can add the cardamom and roasted cashews at the end if you like. Make sure you turn of the heat at 6 hrs, and if you find the payasam already condensed at that time transfer it to another vessel because the slow cooker's vessel retains heat and keeping it in it will continue to condense the payasam further.


Thursday, April 26, 2012

Shahi Tukra or Shahi Tukda or Double Ka Meetha

I first tasted this sumptuous dessert in an Indian restaurant at a buffet. I loved it! Needless to say it has been on my list to make for a long long time. I finally tried it and was not disappointed in the least. However my first attempt was not perfect and I have some learnings to share from the same so that yours can end up yum yum yum!


Difficulty level : Medium

Time:  1/2 day (prep time) 40 min ( Cooking Time)

Ingredients
  • Bread ( 4 slices)
  • Milk ( 1/2 a gallon)
  • Sugar ~ 2 cups ( as required 1:2 ratio with the water used for sugar syrup)
  • Ghee ~ 1 cup or more (for shallow deep frying)
  • Chopped nuts (Almonds, Cashews, Pistachios) -2 or 3 tbsp
  • Saffron ( a pinch)
  • Cardamom powder ( a pinch)
  • a few drops of lemon juice

Method de Preparation
  1. Cut each bread slice into 4 triangles and then allow to dry uncovered (for a few hours or a half a day) so that it becomes dry and the moisture evaporates. (I failed to do this as I did not realize it was  needed and as a result the bread became soggy when soaked in the milk and sugar syrup). 
  2. Soak nuts in water for a few hours and then chop them into tiny pieces.
  3. Boil milk in a flat bottom vessel and allow it to reduce in quantity till it thickens. Add the saffron strands to it and a bit of cardamom powder in the very end. Reduce to about half the original volume. Add a little bit of sugar and allow it all to come together(~ 1/2 cup sugar).
  4. Taste a little bit ( do not drink spoonfuls) to see if you need more sugar.
  5. Take another pan and boil sugar and water in it in the ratio 2:1. You can use about 1 cup sugar to 1/2 cup water for this quantity. Add a little bit of cardamom to it and squeeze a few drops of lime to prevent it from crystallizing.
  6. Use a small shallow flat bottom pan and deep fry the bread slices in the ghee (clarified butter). Start with just enough required and add more as needed. You can use some oil too but that will affect the taste some. Use medium flame to ensure even frying and avoid browning.
  7. As each batch finishes frying, soak it in the sugar syrup. When you take out the next batch, transfer the first batch from the sugar syrup into the milk mixture.
  8. In the end when all the bread has been fried, fry the nuts in the remaining ghee and add to the milk mixture.
  9. Refrigerate for a few hours and serve.

Sources:  I checked out the versions here, here and here before coming up with what I wanted to use for the above :)


Thursday, March 8, 2012

Moong Sundal


If you are looking for a sundal that doubles as a healthy snack, does not require too much preparation, then here is one.

Again you can make this as a sundal, as a side salad or a snack for those hungry tea time bites.

Difficulty level : Easy

Time: Preparation time ( 2 hours), Cook Time ( 10 min)

Ingredients:
  • a cup or two of moong dal
  • salt
  • a pinch of turmeric
  • water
  • little bit of lime juice

To temper:
  • oil
  • 1 tbsp mustard seeds
  • 2 tsps urad dal (split black gram dal)
  • 3 green chilies slit or chopped in small pieces, or you can use 4 red chilies
  • 1 to 2 tbsps grated coconut (fresh is always better)
  • 2 to 3 nos curry leaves or a bunch of cilantro chopped finely
  • hing ( a pinch of asafoetida)

Method de Preparation:
  1. Soak the moong dal in a vessel immersed in water for an hour. Drain it and leave it as such for 1 hr. When you touch it you will find it soft when pressed but not mushy. 
  2. In the meantime get all the ingredients for tempering ready - chop the chilies and curry leaves finely.
  3. Take oil in a pan, when hot add the mustard. Allow to splutter and add the urad dal and the hing. Soon after add the curry leaves and the green or red chilies. Mix in the moong dal, allow to blend together. Add salt.  You can add cilantro instead of the curry leaves if you like too.
  4. At the end squeeze some lime juice for taste. And it is ready!


Thursday, January 26, 2012

Thenga Manga Pattani Sundal


Talking of beach sundals, one other that is extremely famous is the thenga -manga - pattani sundal ( coconut - mango (raw) - peas).  This Navarathri I got to try out different sundals, one on each day of the festival.  Here is the recipe for the same.

Again you can make this as a sundal, as a side salad or a snack for those hungry tea time bites.

Difficulty level : Easy

Time: Preparation time ( 11 hours), Cook Time ( 10 min)

Ingredients:
  • a cup or two of raw white or green peas
  • salt
  • a pinch of turmeric
  • water
  • little bit of lime juice

To temper:
  • oil
  • 1 tbsp mustard seeds
  • 2 tsps urad dal (split black gram dal)
  • 3 green chilies slit or chopped in small pieces, or you can use 4 red chilies
  • 1 to 2 tbsps grated coconut (fresh is always better)
  • 2 to 3 nos curry leaves
  • hing ( a pinch of asafoetida)
  • small pieces of cut raw mango ( a couple of tbsps) - with the skin is great

Method de Preparation:
  1. Soak the peas in a vessel immersed in water overnight. Pressure cook with a pinch of turmeric with water just immersing the lentils. Make sure to not overcook or they will end up mushy. They will still taste good but will not be separate, like how mine ended up.
  2. When cooked ( should feel soft when pressed and no longer hard), drain excess water and keep aside.
  3. In the meantime get all the ingredients for tempering ready - chop the chilies, mango and curry leaves finely.
  4. Take oil in a pan, when hot add the mustard. Allow to splutter and add the urad dal and the hing. Soon after add the curry leaves and the green or red chilies. Mix in the peas, mango and coconut and add salt as needed.
  5. At the end squeeze some lime juice for taste. And it is ready!


Related Posts with Thumbnails